


Table of Contents
◉ Introduction ◉ The Short Answer ◉ Reader Roadmap ◉ Why Photo Quality Matters for Small Online Brands ◉ What Lightroom Does for Creators and Online Stores ◉ Lightroom vs. Lightroom Classic ◉ A Practical Lightroom Workflow ◉ Editing Rules for Online Store Photos ◉ Lightroom Features Worth Learning First ◉ Where AI Helps — and Where It Can Hurt Trust ◉ Privacy, Security, and Client Data Considerations ◉ Cost and Plan Considerations ◉ When Lightroom Is Not the Right Tool ◉ Common Mistakes and Troubleshooting ◉ Practical Use Cases by Audience ◉ A Simple Editing Checklist ◉ FAQ ◉ Conclusion ◉ Sources
Product photos, thumbnails, profile images, and social posts all carry the same quiet burden: they have to look credible before anyone reads the caption, clicks the product page, or trusts the brand. For creators and small online stores, that creates a practical problem. You may not have a studio, a photographer, or time to learn advanced editing, but your images still need consistent color, clean lighting, sharp details, and a style that feels intentional.
Adobe Lightroom is built for that middle ground. It does not replace good lighting or a clear product shot, but it can help you correct common problems, create repeatable looks, organize large batches, and export images that are ready for websites, marketplaces, email, and social channels. Adobe positions Lightroom as a photo editing and organizing app available across desktop, mobile, and web, with cloud-based access depending on plan and workflow (Adobe, 2026). (adobe.com)
This guide is for creators, Shopify-style store owners, Etsy sellers, solopreneurs, marketers, and small teams that need better visuals without pretending to be professional photographers. Disruptiv-e may earn a commission if readers choose a paid plan through certain links, but recommendations should be based on usefulness, fit, and verifiable product information.
The Short Answer
Lightroom helps non-photographers create more professional-looking photos by making the most important edits easier: exposure, white balance, color consistency, cropping, sharpening, background cleanup, and batch editing. For creators and online stores, the biggest advantage is not dramatic transformation. It is repeatability.
A store with 60 product photos does not need every image to look cinematic. It needs images that look like they belong to the same brand. Lightroom’s presets, copy-and-paste edits, masking tools, and export controls can help you build that consistency across product pages, Instagram posts, Pinterest graphics, email campaigns, and marketplace listings.
Lightroom is especially useful when your raw photos are decent but imperfect: slightly too dark, a little yellow, unevenly cropped, or visually inconsistent from one shoot to the next. It is less useful when the original photo is badly blurred, poorly composed, misleading, or missing important product detail.
For online stores, Lightroom should be treated as part of a product photography workflow, not a magic repair tool. Start with clean lighting, a stable camera or phone, a simple background, and accurate product representation. Then use Lightroom to polish the image while preserving what the customer will actually receive.
Reader Roadmap
• How Lightroom fits into a creator or ecommerce workflow, so you can improve photos without overbuilding your setup.
• Which Lightroom features matter most for product pages, thumbnails, and social content, so you can ignore tools you do not need yet.
• How to build a repeatable editing process, so your product catalog or content feed looks consistent over time.
• Where Lightroom’s AI-assisted tools help, and where human judgment still matters for accuracy and trust.
• What mistakes make edited photos look fake, inconsistent, or less trustworthy to shoppers.
• How to decide whether Lightroom, Lightroom Classic, Photoshop, Canva, or another tool belongs in your workflow.
Why Photo Quality Matters for Small Online Brands
A customer cannot hold your product through a screen. They judge texture, size, color, condition, and brand credibility from the image. Shopify’s product photography guidance notes that high-quality product photographs help customers understand what they will get and can increase trust in a brand (Shopify, 2026). (help.shopify.com)
That does not mean every seller needs a $3,000 camera. It means the image must answer the shopper’s practical questions:
• What does the product actually look like?
• What color is it under normal light?
• How large is it?
• What details matter up close?
• Does the brand look careful enough to trust with my money?
For creators, the same logic applies. A course creator, consultant, YouTuber, or newsletter writer may not sell physical products, but photos still shape perception. A washed-out headshot, inconsistent thumbnail style, or messy flat lay can make good work look less professional than it is.
Lightroom helps because it focuses on photographic correction rather than full graphic design. Canva is useful for layouts. Photoshop is powerful for complex manipulation. Lightroom is where you make the photo itself look cleaner, more balanced, and more consistent.
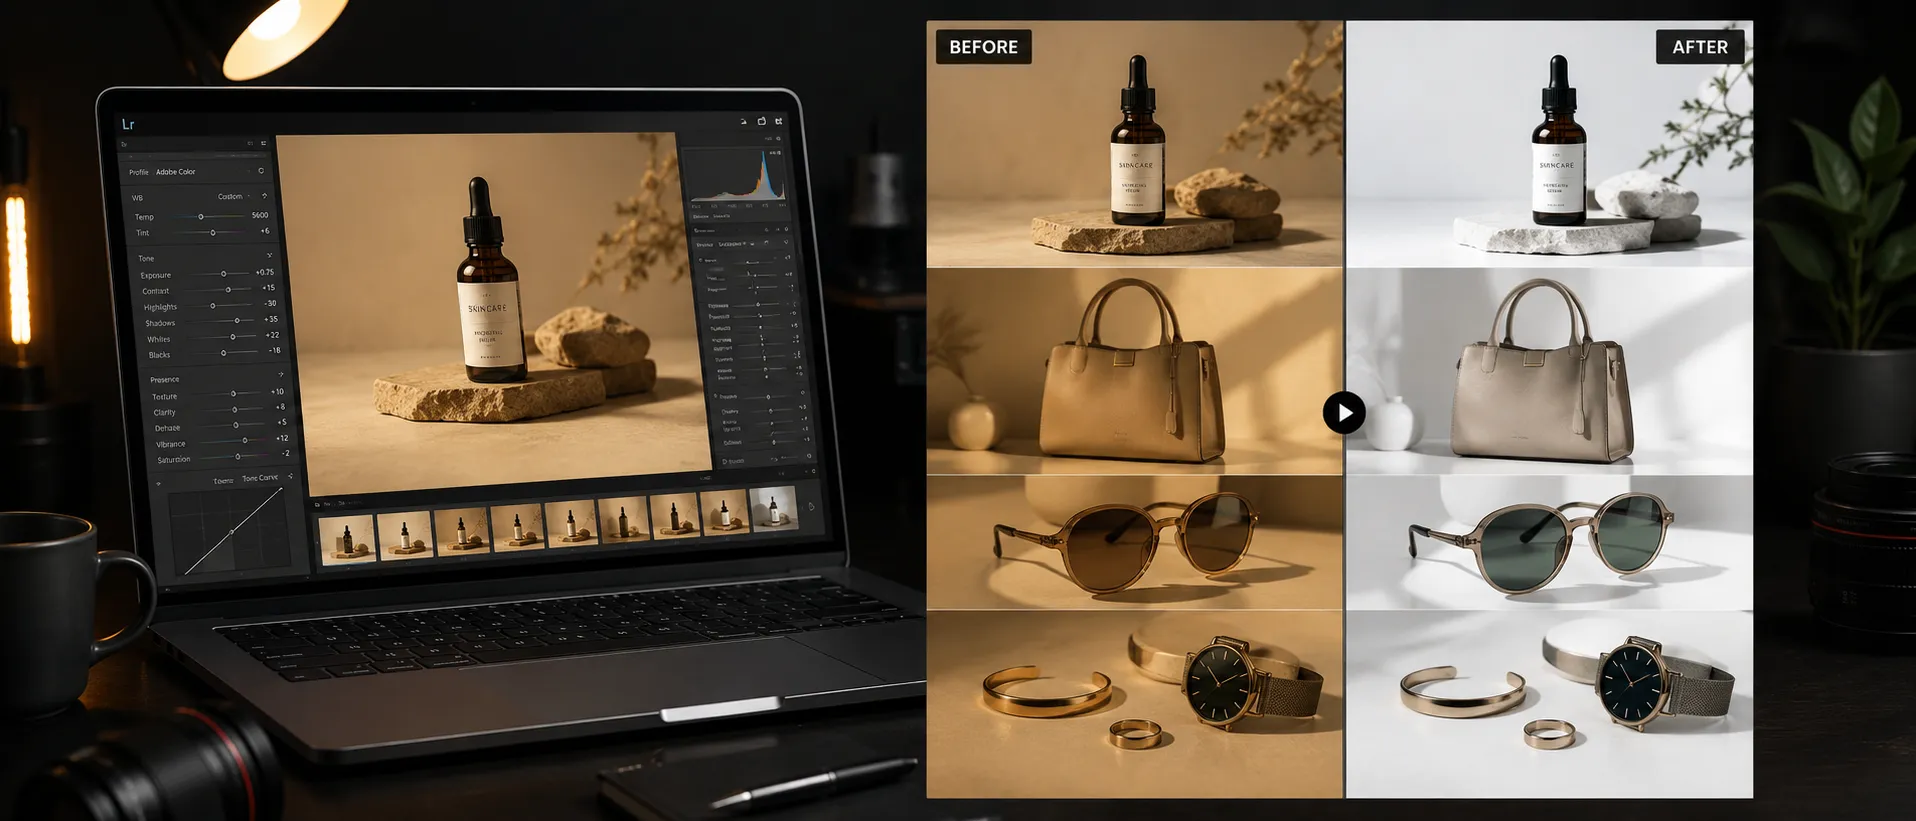
The before-and-after visual above would help readers see the kind of improvement Lightroom is best suited for: not changing the product, but making the original image easier to evaluate.
What Lightroom Does for Creators and Online Stores
Lightroom is a photo editing and organization tool. The current Lightroom ecosystem includes versions for desktop, mobile, and web, while Lightroom Classic remains the desktop-centered version preferred by many photographers who manage local catalogs and large archives (Adobe, 2026). (adobe.com)
For creators and ecommerce teams, the useful parts usually fall into six categories.
1. Basic Image Correction
This is where most non-photographers should spend their time. Lightroom lets you adjust exposure, contrast, highlights, shadows, whites, blacks, color temperature, tint, vibrance, saturation, sharpness, and noise reduction.
For product photos, these edits can fix common problems:
• A white background that looks gray.
• A product shot that is too yellow because it was taken under warm indoor light.
• A dark image where the product detail is hard to see.
• A flat-looking image that needs more contrast.
• A slightly noisy phone photo taken in low light.
The goal is not to make the image “pop” at any cost. The goal is to make the product clear and accurate.
2. Presets for Consistency
A Lightroom preset saves a group of editing settings so you can apply them again. For creators, this can create a recognizable visual style. For online stores, it can keep product images from looking like they were shot by five different people in five different rooms.
A good store preset might include:
• Slightly brighter exposure.
• Clean neutral whites.
• Controlled contrast.
• Moderate sharpening.
• Very light vibrance.
• No heavy color filters that distort the product.
The most common mistake is using trendy presets designed for lifestyle photography on product photos. A warm film preset may look attractive on a coffee shop portrait, but it can misrepresent the color of a shirt, candle, print, or skincare bottle.
3. Masking and Local Adjustments
Lightroom’s masking tools let you adjust one part of an image without changing the whole photo. That matters when the product is fine but the background is too dark, the label needs more clarity, or a face in a creator photo needs subtle exposure correction.
Adobe’s current Lightroom feature pages highlight AI-assisted editing capabilities such as selecting subjects, improving portraits, and removing distractions, although available features may vary by app version and plan (Adobe, 2026). (adobe.com)
For small businesses, local adjustments are useful for:
• Brightening a product label without overexposing the packaging.
• Reducing glare on a shiny surface when possible.
• Making a face more evenly lit in a creator headshot.
• Darkening a distracting background corner.
• Adding clarity to texture, stitching, engraving, or print detail.
Use this carefully. If you brighten only the product but leave unrealistic shadows, the image can start to look pasted together.
4. Distraction Removal
Lightroom includes tools for removing distractions from photos, including AI-assisted removal capabilities in recent versions. Adobe’s Lightroom Classic “What’s New” documentation references Generative Remove among its current editing updates (Adobe, 2026). (adobe.com)
For product and creator images, this is useful for small distractions:
• Dust on a background.
• A small mark on the table.
• A stray thread that is not part of the product.
• A tiny reflection or background object.
Do not use removal tools to hide flaws that affect what the buyer receives. Removing a scratch from a used item, changing the shape of a handmade product, or cleaning up damage on a resale item can create a trust problem. Editing should clarify the product, not misrepresent it.
5. Organization and Batch Workflow
Lightroom is not just an editor. It also helps you organize, rate, filter, and apply edits across batches. Adobe has introduced AI-powered Assisted Culling in Lightroom-related workflows to help identify stronger images and filter low-quality ones, though creators should still review final selections manually (Adobe, 2026). (blog.adobe.com)
For creators and stores, this matters because photo work often happens in groups:
• 30 product photos from one shoot.
• 12 headshots for a personal brand refresh.
• 80 event photos for a newsletter recap.
• 20 images for a product launch campaign.
Batch editing reduces the chance that each image has a different color temperature, crop, or contrast level.
6. Export Control
A good edit can still fail if the export is wrong. Lightroom lets you export images with specific file types, dimensions, quality settings, and naming conventions.
That is important for ecommerce because platforms and ad channels often have image requirements. Google Merchant Center’s product data specification includes image link requirements and has announced updated minimum product image size requirements of at least 500 x 500 pixels, with enforcement beginning January 31, 2027 (Google Merchant Center, 2026). (support.google.com)
Even if you are not using Google Merchant Center today, exporting clean, adequately sized images helps future-proof your catalog.
Lightroom vs. Lightroom Classic: Which One Should Non-Photographers Use?
Adobe uses two closely related names that can confuse new users: Lightroom and Lightroom Classic.
Lightroom is the more cloud-centered version, designed for editing across desktop, mobile, and web. Lightroom Classic is the desktop-focused version built around local catalogs, file management, and a more traditional photography workflow (Adobe, 2026). (adobe.com)
For most creators and small online stores, regular Lightroom is easier to start with. It is simpler, works across devices, and makes sense if you shoot on a phone, edit on a laptop, and post from mobile.
Lightroom Classic may be better if you:
• Shoot large batches with a dedicated camera.
• Want detailed local file organization.
• Keep photos on external drives.
• Already understand folders, catalogs, backups, and import settings.
• Need a workflow closer to professional photography.
| Workflow need | Better fit | Why it matters |
|---|---|---|
| Quick edits from phone photos | Lightroom | Easier cross-device access and simpler interface |
| Large product catalog stored locally | Lightroom Classic | More control over local files and catalogs |
| Social content and creator branding | Lightroom | Faster mobile-to-desktop workflow |
| Professional studio shoots | Lightroom Classic or both | Better for high-volume desktop workflows |
| Heavy object manipulation or composites | Photoshop | Lightroom is not designed for complex pixel-level editing |
The practical recommendation: start with Lightroom unless you already know why you need Lightroom Classic.
A Practical Lightroom Workflow for Product Photos and Creator Content
A professional-looking image usually comes from a repeatable process, not one dramatic edit. Use this workflow when you are editing product photos, brand images, or content assets.
Prerequisites
Before opening Lightroom, prepare the basics:
• A phone or camera that can capture sharp images.
• A clean background or simple shooting area.
• Soft, even light from a window, light box, or diffused lamp.
• A tripod, phone stand, or stable surface.
• A folder structure for originals and edited exports.
• Your website or marketplace image size requirements.
Adobe’s Lightroom system requirements vary by device and version, and Adobe recommends stronger hardware for smoother performance, especially for mobile editing and AI-assisted features (Adobe, 2026). (helpx.adobe.com)
Step 1: Shoot for Editing, Not Rescue
Take the photo with the edit in mind. Keep the product sharp, leave enough space around it for cropping, and avoid mixed lighting. Mixed lighting happens when daylight and warm indoor bulbs hit the product at the same time, creating color that is hard to correct.
Why it matters: Lightroom can correct exposure and color, but it cannot reliably fix every blur, bad angle, or hidden product detail.
Practical tip: take one extra photo with a white or neutral gray object near the product, then remove it for the final shot. It can help you judge color later.
Step 2: Import and Sort Before Editing
Import your images into Lightroom and remove obvious rejects first. Look for blur, closed eyes, awkward reflections, cropped-off edges, and duplicate shots.
Why it matters: editing bad photos wastes time. A clean first selection makes the rest of the process faster.
Practical tip: use ratings or flags. For example, mark possible keepers first, then compare only those. If AI-assisted culling is available in your version, treat it as a helper, not the final judge.
Step 3: Correct White Balance
White balance controls whether the photo looks too warm, too cool, too green, or too magenta. For product images, color accuracy is part of customer trust.
Why it matters: a beige bag should not look yellow, a white candle should not look blue, and a navy shirt should not look black.
Practical tip: adjust temperature and tint before adding creative style. If the product color changes too much after a preset, the preset is wrong for ecommerce.
Step 4: Fix Exposure and Contrast
Use exposure to make the overall image brighter or darker. Then adjust highlights, shadows, whites, and blacks to recover detail.
Why it matters: product images often fail because the background is bright but the product is dull, or the product is visible but the highlights are blown out.
Practical tip: avoid pure white clipping on important product areas. A white background can be clean without destroying edges, labels, or texture.
Step 5: Crop for the Destination
Crop differently for each use case. A product page may need square or portrait images. Instagram Reels covers, Pinterest pins, and email headers may need different ratios.
Why it matters: one crop rarely works everywhere. A product centered for a marketplace may look too small in a social thumbnail.
Practical tip: create virtual copies or duplicate edits for different exports instead of repeatedly changing the same final image.
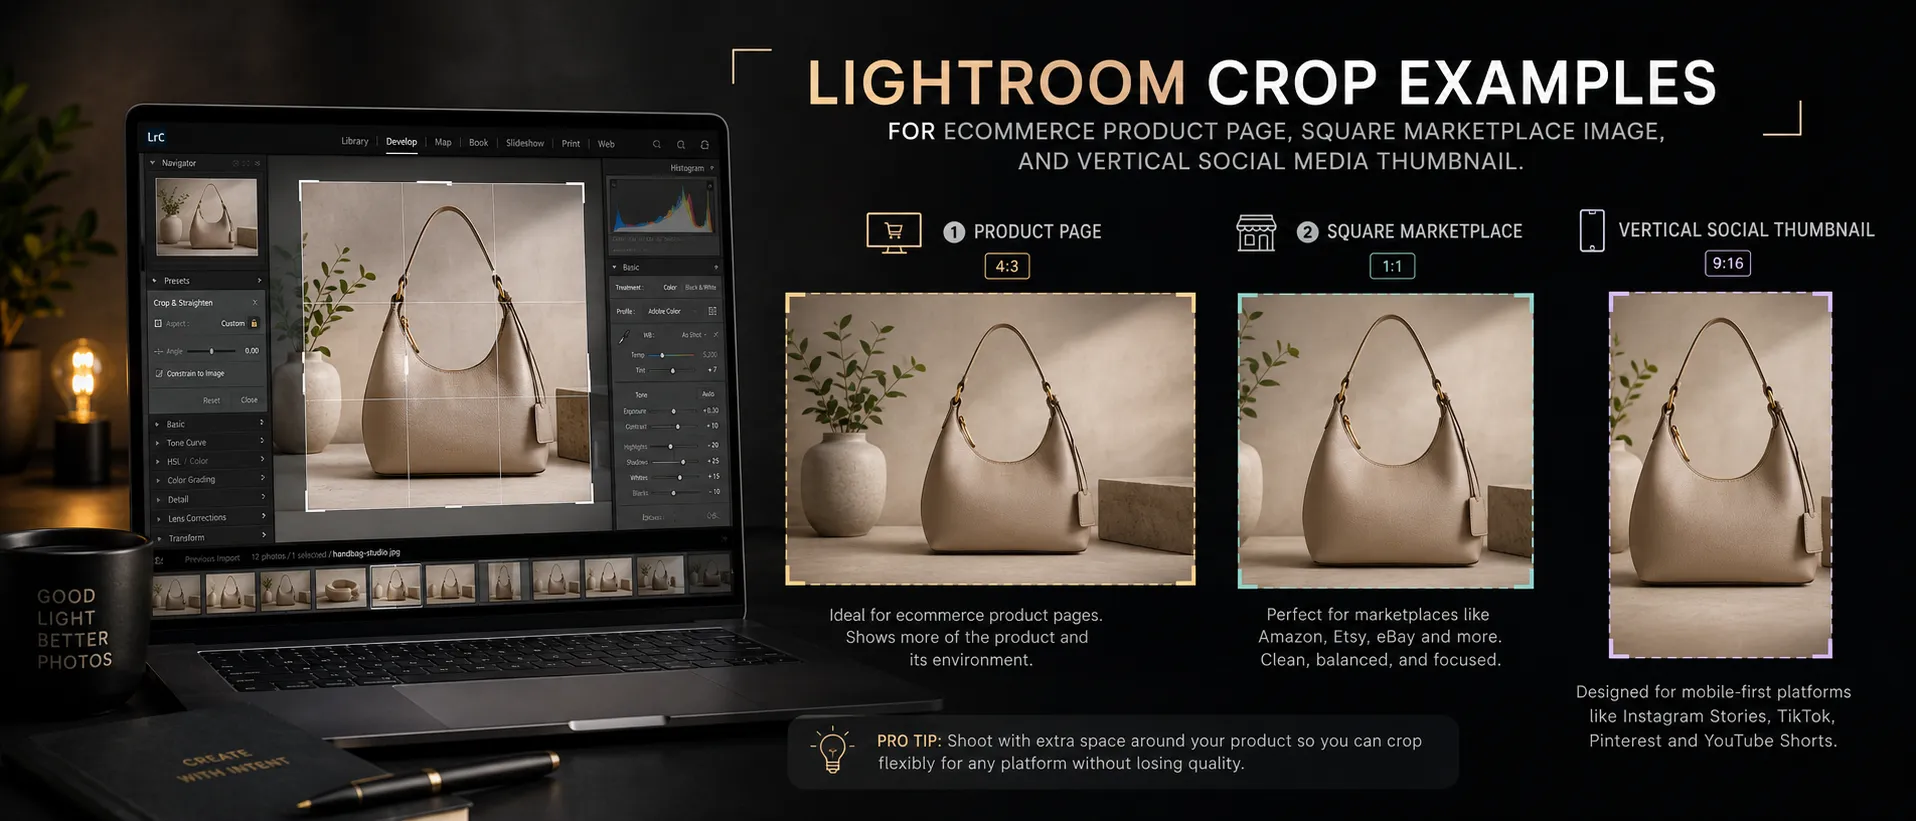
A visual crop comparison would make this workflow easier to follow because creators often underestimate how much composition changes between a product page and a social feed.
Step 6: Apply a Light Brand Preset
Once the image is accurate, apply your preset or copied edit. Keep it subtle for products and slightly more expressive for lifestyle or creator images.
Why it matters: consistency makes your store or feed feel more intentional, but over-styling can reduce trust.
Practical tip: create separate presets for “Product Neutral,” “Lifestyle Warm,” and “Creator Portrait” instead of forcing one look onto every image.
Step 7: Use Masks for Small Local Fixes
If the label is slightly dark, the face needs gentle brightening, or the background corner is distracting, use masks.
Why it matters: global edits can overcorrect the whole photo when only one area needs help.
Practical tip: local edits should be invisible. If a shopper can tell one part of the image was aggressively edited, reduce the effect.
Step 8: Remove Only Honest Distractions
Use removal tools for dust, lint, background marks, or small visual clutter. Do not remove product defects that affect the buyer’s decision.
Why it matters: ecommerce editing has an ethical line. A cleaner background is acceptable; a misleading product is not.
Practical tip: for resale, handmade, or one-of-one products, keep condition details visible and use additional close-up photos.
Step 9: Export for Web, Store, and Social
Export images at the correct dimensions and quality for your platform. Keep a master edited version and separate exports for product pages, ads, social, and email.
Why it matters: oversized files can slow pages, while tiny images can look soft or fail platform requirements.
Practical tip: use descriptive filenames such as linen-tote-natural-front.jpg instead of IMG_4821.jpg. This helps organization and can support image SEO when used appropriately on your site.
Editing Rules for Online Store Photos
Lightroom gives you enough control to improve trust or accidentally damage it. These rules keep edits commercially useful.
Keep Product Color Honest
Color is not just aesthetic. It affects returns, complaints, and customer expectations. Edit against a neutral reference when possible, and review images on more than one screen.
A phone display with vivid color settings may make edits look more saturated than they are. If you sell color-sensitive products such as apparel, cosmetics, art prints, or home decor, be conservative.
Show Texture and Scale
A polished hero image is not enough. Use Lightroom to prepare supporting photos:
• Close-up texture shot.
• In-hand or in-room scale shot.
• Packaging shot.
• Detail shot of label, stitching, hardware, or finish.
• Variant photo for each color or style.
Lightroom can help these images look consistent, but the photo set still needs to answer practical buying questions.
Separate Product Images from Lifestyle Images
Use a neutral style for main product images and a more editorial style for lifestyle content. A warm, moody look can work well on Instagram but may be wrong for the main product image on a shopping page.
Google Merchant Center requires a main image URL for product listings and maintains product image specifications that merchants should review before relying on edited catalog images for free listings or ads (Google Merchant Center, 2026). (support.google.com)
Do Not Chase Trends at the Expense of Clarity
Trendy edits age quickly. Heavy grain, crushed blacks, orange skin tones, and dramatic teal shadows can make a brand look less reliable when applied to products.
For ecommerce, clarity usually outperforms mood. Use style where it supports the brand, not where it hides the product.
Lightroom Features Worth Learning First
Lightroom has more tools than a beginner needs. Start with the features that have the highest practical return.
Presets
Use presets as a starting point, not a one-click finish. Build your own from edits that work on your actual photos.
Best for:
• Consistent creator feed style.
• Product collection launches.
• Blog and newsletter images.
• Marketplace listing batches.
Avoid presets that change product color too aggressively.
Copy and Paste Edits
After editing one image from a shoot, copy the settings to similar images. Then adjust each one manually.
Best for:
• Product variants shot under the same light.
• Headshots from the same session.
• A batch of flat lays.
• Event photos from one location.
This is one of Lightroom’s most valuable time-savers for small teams.
Masking
Use masking for selective edits. For example, brighten only the product, sharpen only the label, or reduce the brightness of a distracting background.
Best for:
• Product labels.
• Portraits.
• Food and beverage images.
• Jewelry or small objects.
Use restraint. Local edits can look fake when pushed too far.
Healing and Remove Tools
Use these for small distractions. Adobe’s current Lightroom pages highlight removing distractions as a core capability, and recent Lightroom updates include AI-powered removal features in supported versions (Adobe, 2026). (adobe.com)
Best for:
• Dust.
• Background spots.
• Tiny unwanted objects.
• Minor surface lint.
Not for:
• Changing product condition.
• Removing legally required label details.
• Making a used item look new.
• Altering body shape in creator portraits.
Export Presets
Create export presets for common destinations:
• Product page square.
• Website blog image.
• Instagram portrait.
• Pinterest vertical.
• Email header.
• High-resolution archive.
This prevents last-minute guessing and keeps your visual workflow consistent.
Where AI Helps — and Where It Can Hurt Trust
Adobe has been adding AI-assisted features across Lightroom and Creative Cloud. Adobe’s June 2026 Creative Cloud update introduced Photo to Video capabilities powered by Firefly and Google Veo, while also expanding workflow assistance such as culling and image selection tools (Adobe, 2026). (blog.adobe.com)
For creators, AI can help with speed:
• Finding stronger shots faster.
• Removing small distractions.
• Creating short motion assets from still images.
• Improving portrait workflow.
• Reducing repetitive editing decisions.
For online stores, AI requires more caution. Product images are not just creative assets; they are part of the buying decision. If AI changes the product, background, scale, texture, or visible condition in a way that could mislead the customer, the edit has gone too far.
Adobe’s Content Credentials documentation describes Content Credentials as metadata that can provide information about how content was made or edited, including whether AI tools were involved (Adobe, 2026). (helpx.adobe.com) For brands using AI-assisted visuals, transparency tools like this may become more important as customers, platforms, and publishers pay closer attention to synthetic media.
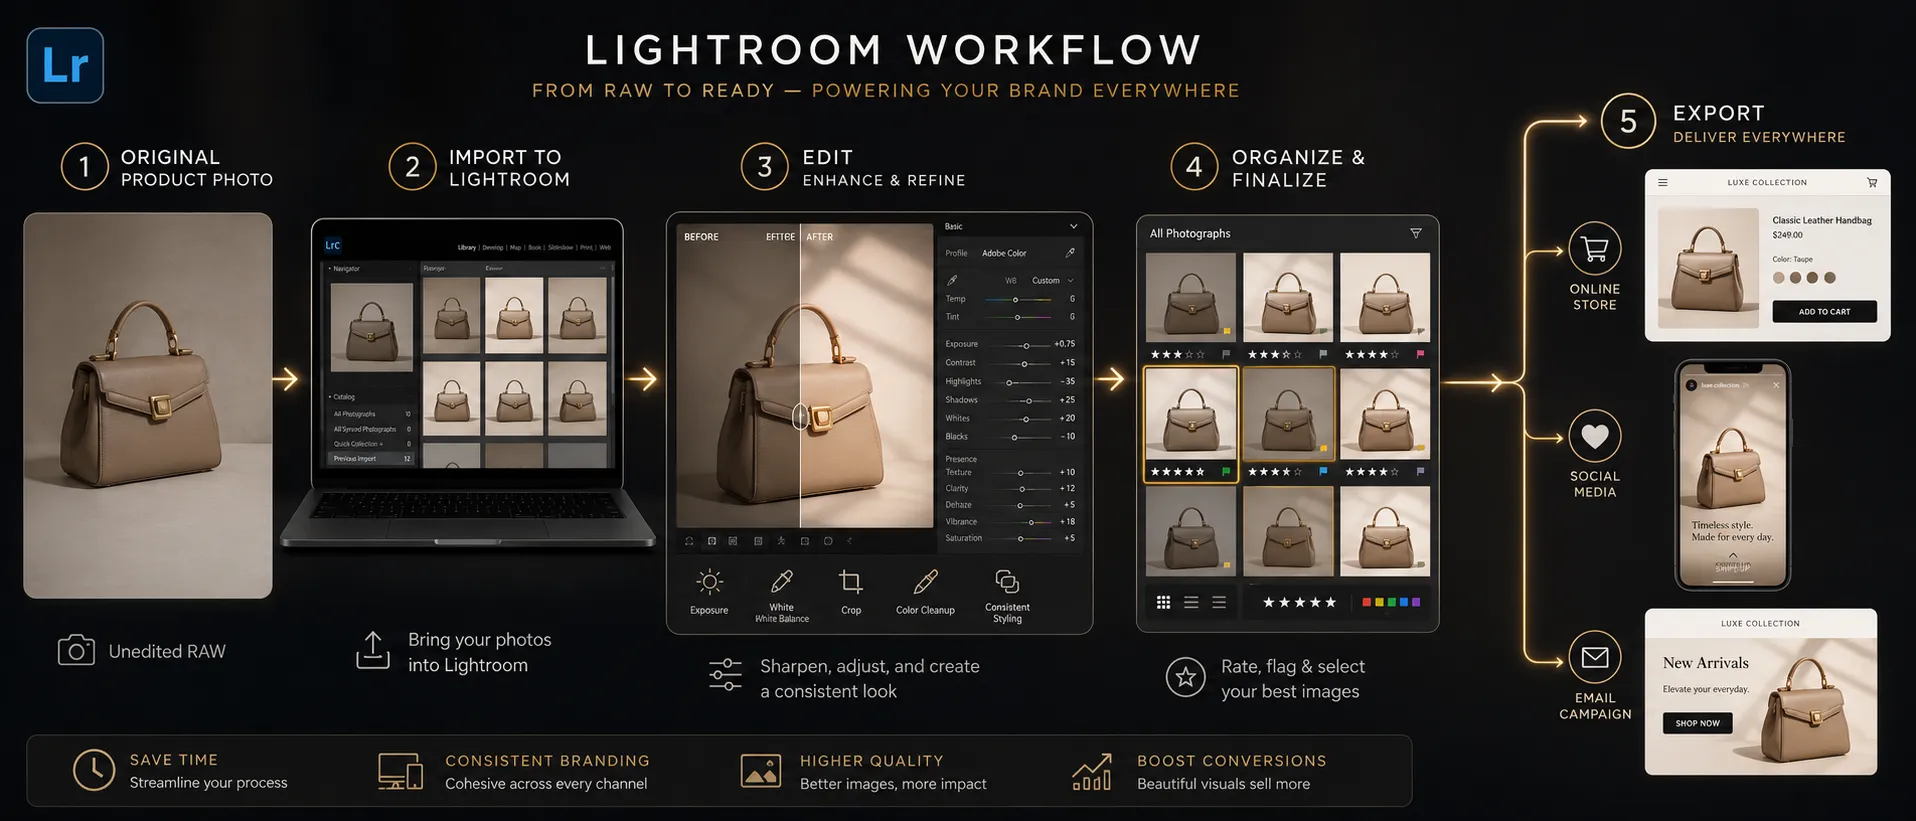
A workflow diagram here would help teams standardize who shoots, who edits, who approves, and where each final image is published.
Privacy, Security, and Client Data Considerations
Lightroom can involve cloud storage, account access, and synced images depending on how you use it. Adobe’s Privacy Center and Privacy Policy describe how Adobe provides information about privacy choices and data handling across its products and services (Adobe, 2025). (adobe.com)
For creators and stores, the practical risk is not usually complex cybersecurity. It is accidental exposure or poor access control.
Consider these points:
• Do not upload unreleased product images to shared accounts unless the team needs access.
• Use separate folders or albums for client work, personal photos, and public brand assets.
• Review who has access to your Adobe account, shared albums, and connected devices.
• Be careful with customer images, influencer photos, children’s images, private event photos, or confidential product prototypes.
• Check vendor documentation before using cloud-based tools for regulated, sensitive, or client-restricted material.
• Keep local backups of important original images instead of relying on one cloud account.
Adobe’s Trust Center provides information about security, privacy, compliance, and service availability for Adobe products and systems (Adobe, 2026). (adobe.com) That documentation should be considered the source of truth for production-critical questions.
Cost and Plan Considerations
Lightroom is subscription-based. Adobe’s official Lightroom pricing page lists Lightroom plans and notes that Lightroom can be purchased as a single app, with annual plans shown on the page and Photography plans that may include Lightroom and Photoshop (Adobe, 2026). (adobe.com)
Do not choose a plan only by the lowest monthly number. Choose based on workflow:
• If you only need photo editing and cloud access, a Lightroom plan may be enough.
• If you also need Photoshop for compositing, advanced retouching, or graphic manipulation, compare Photography plan options.
• If you work with large photo libraries, storage limits matter.
• If you create video or AI-generated assets, review generative credit terms and plan limits directly on Adobe’s current pages.
• If your business has multiple editors, check whether an individual plan is appropriate or whether a team plan is needed.
Pricing, included apps, storage, and generative AI access can change. Use Adobe’s official pricing page before publishing purchase recommendations or making a business decision.
When Lightroom Is Not the Right Tool
Lightroom is strong, but it is not the answer to every visual problem.
Use Photoshop Instead When You Need Pixel-Level Editing
Photoshop is better for complex background replacement, advanced retouching, compositing, object reconstruction, and detailed design work. Adobe’s own Lightroom vs. Photoshop guidance frames the tools as different parts of a photo workflow rather than identical substitutes (Adobe, 2026). (adobe.com)
Use Photoshop when you need to:
• Combine multiple images.
• Create complex mockups.
• Remove large objects.
• Edit text or labels in an image.
• Build composite advertising visuals.
Use Canva or Adobe Express for Layouts
Lightroom edits photos. It does not design a full carousel, sales banner, YouTube thumbnail, or story template as quickly as a layout tool. After editing in Lightroom, you may still use Canva, Adobe Express, Figma, or another design tool to add text, graphics, and layout.
Hire a Photographer When the Shoot Matters More Than the Edit
If you are launching a premium product, building a lookbook, photographing reflective objects, shooting cosmetics, or creating campaign images for paid ads, a professional photographer may save money by getting the source images right.
Lightroom improves good inputs. It does not replace lighting knowledge, styling, composition, or art direction.
Common Mistakes and Troubleshooting
Mistake: The Product Looks Different in Every Photo
Why it happens: images were taken under different lighting, edited one by one, or exported with inconsistent settings.
How to fix it: shoot each collection under the same light, edit one reference image first, then copy settings across the batch. Adjust individually only after the baseline is consistent.
Mistake: White Backgrounds Look Gray or Yellow
Why it happens: exposure and white balance are off, or the background was not evenly lit.
How to fix it: adjust white balance first, then exposure and whites. If the background still looks uneven, improve the lighting setup next time instead of pushing the edit too far.
Mistake: The Image Looks Over-Edited
Why it happens: too much clarity, saturation, contrast, sharpening, or preset intensity.
How to fix it: reduce global effects and compare against the original. For product photos, accurate and clean usually beats dramatic.
Mistake: Skin Looks Unnatural in Creator Portraits
Why it happens: portrait retouching tools or smoothing settings were applied too aggressively.
How to fix it: use subtle adjustments. Keep natural texture, avoid extreme whitening, and check the image on a second screen before publishing.
Mistake: Product Details Are Soft After Export
Why it happens: the crop was too tight, the original was slightly blurred, or the export size was too small.
How to fix it: start with a sharper image, avoid excessive cropping, apply moderate sharpening, and export at dimensions appropriate for your platform.
Mistake: The Edited Photo Loads Slowly on the Website
Why it happens: files were exported too large or uploaded without compression.
How to fix it: create web-specific exports and use your ecommerce platform’s image optimization guidance. Keep original high-resolution files separately.
Mistake: AI Removal Changed the Product
Why it happens: the removal tool generated pixels that altered edges, texture, or product shape.
How to fix it: undo the edit or use a smaller correction area. For ecommerce, never publish an AI-cleaned image unless the product itself remains accurately represented.
Practical Use Cases by Audience
For Etsy, Shopify, and Marketplace Sellers
Use Lightroom to standardize product photos across listings. Create one neutral preset for main images and one warmer preset for lifestyle images. Export images with consistent naming and dimensions.
Best workflow: shoot batches, edit one image as the reference, sync edits, crop for marketplace requirements, export, then upload.
For Course Creators and Consultants
Use Lightroom for headshots, workspace images, behind-the-scenes photos, and lead magnet visuals. The goal is credibility, not glamour. Keep colors aligned with your brand palette, but avoid edits that make you look artificial.
Best workflow: create a portrait preset, a desk or flat lay preset, and a social crop export.
For Influencers and UGC Creators
Lightroom can help maintain a recognizable feed style while preserving natural-looking content. Use presets lightly and make sure brand-sponsored product images remain accurate.
Best workflow: edit on mobile, save reusable presets, export separate versions for Reels covers, stories, and brand deliverables.
For Small Marketing Teams
Use Lightroom as the photo standardization step before assets move into design tools. This keeps campaigns from mixing dark phone photos, bright stock images, and inconsistent event shots without correction.
Best workflow: centralize approved edits in shared folders, document export settings, and create a basic review checklist.
A Simple Editing Checklist for Professional-Looking Results
Use this checklist before publishing a Lightroom-edited image:
• Is the product or subject sharp?
• Does the color look accurate?
• Are whites neutral rather than yellow, blue, or gray?
• Is the crop appropriate for the destination?
• Does the image match the rest of the collection?
• Are important details visible?
• Did any AI or removal edit change the product?
• Is the file size appropriate for web use?
• Is the filename descriptive?
• Do you still have the original image saved?
This checklist is intentionally simple. Most creator and store images fail because of basics, not because of advanced editing limitations.
FAQ
Conclusion: Use Lightroom to Build Trust, Not Just Better-Looking Images
Lightroom is most valuable when you treat it as a consistency tool. For creators, that means a recognizable visual style across platforms. For online stores, it means product photos that feel clean, accurate, and trustworthy from one listing to the next.
The right workflow is straightforward: shoot clearly, edit lightly, preserve accurate color, crop for the destination, remove only honest distractions, and export with consistent settings. You do not need to become a photographer to improve your images. You do need a repeatable process.
Before your next product launch or content batch, use this quick checklist:
• Create one neutral Lightroom preset for product images.
• Create separate crops for store, social, and email.
• Keep original files backed up.
• Review color accuracy before publishing.
• Use AI-assisted edits only when they do not mislead the viewer.
• Check Adobe’s current pricing and plan details before subscribing.
• Document your export settings so future images match.
Lightroom will not fix a careless shoot, but it can make a careful small business look more polished, consistent, and trustworthy.
Sources
• Adobe Lightroom Product Page — https://www.adobe.com/products/photoshop-lightroom.html
• Adobe Lightroom Pricing and Membership Plans — https://www.adobe.com/products/photoshop-lightroom/plans.html
• Adobe Lightroom Classic Product Page — https://www.adobe.com/products/photoshop-lightroom-classic.html
• Adobe Lightroom vs. Photoshop Decision Guide — https://www.adobe.com/creativecloud/photography/lightroom-vs-photoshop.html
• Adobe Lightroom System Requirements — https://helpx.adobe.com/lightroom-cc/system-requirements.html
• Adobe Lightroom Classic: What’s New — https://helpx.adobe.com/lightroom-classic/help/whats-new.html
• Adobe Creative Cloud June 2026 Updates — https://blog.adobe.com/en/publish/2026/06/15/from-culling-to-compositing-new-creative-cloud-innovations-across-every-stage-of-your-workflow
• Adobe Content Credentials Overview — https://helpx.adobe.com/creative-cloud/apps/adobe-content-authenticity/content-credentials/overview.html
• Adobe Privacy Policy — https://www.adobe.com/privacy/policy.html
• Adobe Privacy Center — https://www.adobe.com/privacy.html
• Adobe Trust Center — https://www.adobe.com/trust.html
• Google Merchant Center Product Data Specification — https://support.google.com/merchants/answer/7052112?hl=en
• Shopify Product Photography Help — https://help.shopify.com/en/manual/products/product-media/product-photography